My friend Judith started sewing a little while ago and really got into it. I am always excited when any of my friends pick up sewing as a hobby as I love to see what ideas other people come up with and the things they create.
A couple of weeks back Judith asked me if I could help her figure out how to recreate an apron she had seen, for her friend. She would like to make it as a Christmas present for her and didn't know where to start. I thought that was a very sweet idea and I liked the look of said apron myself which led me to making myself one, taking a few pictures along the way for Judith.
Since Christmas is sort of around the corner for anyone planing to make any presents by hand, I thought I'd share her "tutorial" here. I hope this is helping a few of you readers who are still thinking about what to make for Christmas. It's a good beginners project.
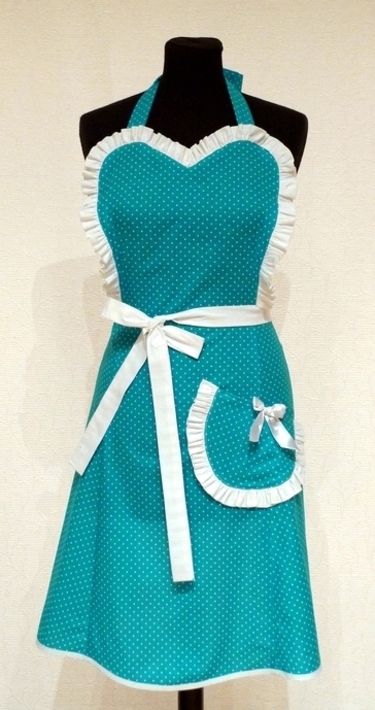
This is the picture of the apron Judith wanted to recreate.
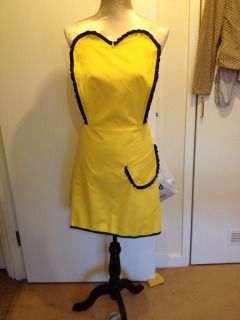
I used this opportunity for some fabric stash busting and went for a yellow and black colour combination.

my version. I hope you can read the measurements. Please adjust where necessary.
I am not very good with fancy computer stuff, so I hope a picture of what pieces to cut helps. I think the original apron is cut as one piece or a middle piece and two side pieces but this layout was the most economical for my fabric scraps and the end result looks the same.
The measurements I used
Top:
12.5" long at center fold
5"wide at waist (for a total of 10")
6.5" wide at the top
I drew the sweetheart free hand
Skirt:
12.5" wide at waist
18" wide at hem
19"long
I drew the pocket free hand, the size I wanted it to be
The measurements I used
Top:
12.5" long at center fold
5"wide at waist (for a total of 10")
6.5" wide at the top
I drew the sweetheart free hand
Skirt:
12.5" wide at waist
18" wide at hem
19"long
I drew the pocket free hand, the size I wanted it to be
I cut the top on the fold, as well as the "skirt" piece. Not pictured in the pattern are the straps I made from the same fabric. I cut 5cm wide and 50 cm long rectangles (two for the waist strap and one for the neck strap that I cut in half) for that but you could just use ribbon instead. It's less work and works just as well. I just ran out of ribbon.
I used about 1/2m (140cm wide) cotton drill, 2m of 2" satin ribbon (more if you want to use it as and some black bias tape that I had left. This is a very inexpensive project (depending on the fabric you use).
Cut out your pieces.
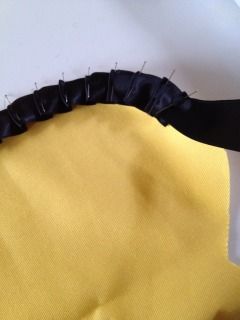
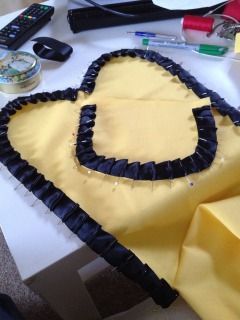
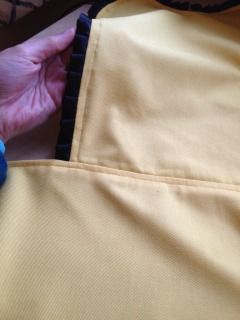
Top with pleated detail: Pin your ribbon onto the top piece around the sides and sweetheart neckline. The right side of the fabric is facing up and you pin all the way around the outside. You can buy pre-pleated ribbon for that. My shop didn't have any so I had to pleat it myself.
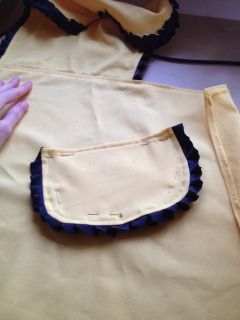
pleat all the way around the pocket, too
Stitch all the way around about 1cm from the outer edge. I also zig zagged the raw edges (you can do that before pinning the ribbon on, too. I find doing it after sewing on the ribbon reduces the bulk a bit and also secures the ribbon even more.
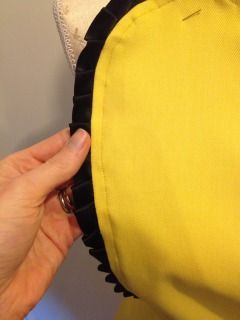
Then fold the ribbon edge around to the back and press. Topstitch all the way around et voila, you have a rushed finish.
Now overlock or zig zag the waist line- edge of your top piece and also the upper edge/waistline of your "skirt" piece.
Pin the top piece to the skirt piece along the waistline (center lines matching, right sides of the fabric facing) sew both pieces together and press seam allowance toward the skirt. Top stitch along the waist of the whole "skirt" for a nice finished edge.
Now you are almost done.
Place your pocket where you would like it to be, pin in place and sew. Hem the sides of the "skirt" and the hem. I finished my hem with bias tape in black to pick up the fabric one more time. You can also apply the pleating as on the bodice to add any other trim.
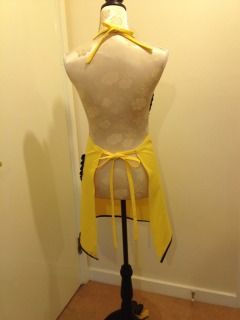
All that's missing now is the ties and a few finishing touches.
I made my own straps. You can either cut strips of fabric the width and length you want plus hem allowance and sew a double folded narrow hem all the way around.
Or you can cut the strips double the width of the strap plus seam allowance, fold then lengthwise (right sides of fabric facing) and sew along the long side and one of the short sides. Turn them inside out, press and ta da, you have a strap.
Attach to the top and skirt and you are done. Add bows and other details if you wish and you have your finished apron.


Pin the top piece to the skirt piece along the waistline (center lines matching, right sides of the fabric facing) sew both pieces together and press seam allowance toward the skirt. Top stitch along the waist of the whole "skirt" for a nice finished edge.
Now you are almost done.
Place your pocket where you would like it to be, pin in place and sew. Hem the sides of the "skirt" and the hem. I finished my hem with bias tape in black to pick up the fabric one more time. You can also apply the pleating as on the bodice to add any other trim.
All that's missing now is the ties and a few finishing touches.
I made my own straps. You can either cut strips of fabric the width and length you want plus hem allowance and sew a double folded narrow hem all the way around.
Or you can cut the strips double the width of the strap plus seam allowance, fold then lengthwise (right sides of fabric facing) and sew along the long side and one of the short sides. Turn them inside out, press and ta da, you have a strap.
Attach to the top and skirt and you are done. Add bows and other details if you wish and you have your finished apron.
I am not very good at explaining things, hence I never do tutorials. I am lacking the teacher-patience-gene I guess. Thankfully this is a very straight forward project so I hope it all makes sense, especially to beginners, who have not made any clothing yet.
Please send me a picture or a link to your blog if you are making an apron like this. I'd love to see how they turn out.
Thanks for this, I think you explained it all really well. Love the apron - it's very cute indeed! I am going to try it out soon. xx
ReplyDeleteThanks Lucylovesya. I'd love to see your version.
ReplyDeleteThat's a really cute apron you've made, how clever! And thanks for the instructions, very clear and useful.
ReplyDeleteI'm just back from a trip to Paris, do pop in and join me on my blog in a red cloche hat in Le Marais if you fancy a peek!
Emalina
www.kikiandthegypsy.blogspot.co.uk
Very cute! Love yellow and black, always such a happy combo
ReplyDeleteThis comment has been removed by the author.
ReplyDeleteHi!! How much fabric does it take for this apron? Thank you!!
ReplyDeleteKocaeli
ReplyDeleteDenizli
Bursa
istanbul
Van
H2Gİ1G
düzce evden eve nakliyat
ReplyDeletedenizli evden eve nakliyat
kırşehir evden eve nakliyat
çorum evden eve nakliyat
afyon evden eve nakliyat
KMGB67
E4B77
ReplyDeleteÜnye Televizyon Tamircisi
Bitlis Lojistik
Binance Referans Kodu
Yozgat Şehir İçi Nakliyat
Balıkesir Lojistik
Bingöl Şehirler Arası Nakliyat
Uşak Şehirler Arası Nakliyat
Hatay Evden Eve Nakliyat
Bitfinex Güvenilir mi
F2C8F
ReplyDeleteDenizli Evden Eve Nakliyat
Sakarya Şehirler Arası Nakliyat
Adıyaman Evden Eve Nakliyat
Batıkent Parke Ustası
Çankaya Boya Ustası
Muğla Şehirler Arası Nakliyat
Elazığ Parça Eşya Taşıma
Balıkesir Lojistik
Ünye Petek Temizleme
4A44B
ReplyDeleteSiirt Şehirler Arası Nakliyat
Osmaniye Şehir İçi Nakliyat
Bartın Parça Eşya Taşıma
Ağrı Şehirler Arası Nakliyat
Batman Parça Eşya Taşıma
İzmir Parça Eşya Taşıma
Şırnak Parça Eşya Taşıma
Çerkezköy Cam Balkon
Ardahan Parça Eşya Taşıma
2194E
ReplyDeleteBursa Şehir İçi Nakliyat
Kars Evden Eve Nakliyat
Balıkesir Şehir İçi Nakliyat
Tekirdağ Şehirler Arası Nakliyat
Gümüşhane Evden Eve Nakliyat
Bursa Evden Eve Nakliyat
Bitci Güvenilir mi
Kütahya Parça Eşya Taşıma
Bursa Şehirler Arası Nakliyat
4B1B9
ReplyDeleteKaspa Coin Hangi Borsada
Nevşehir Şehir İçi Nakliyat
Karabük Parça Eşya Taşıma
Ankara Fayans Ustası
Samsun Şehirler Arası Nakliyat
Eskişehir Şehirler Arası Nakliyat
Kırıkkale Parça Eşya Taşıma
Çanakkale Şehirler Arası Nakliyat
Shibanomi Coin Hangi Borsada
1C116
ReplyDeleteNiğde Lojistik
Kripto Para Nedir
Kayseri Evden Eve Nakliyat
Ünye Oto Boya
Çerkezköy Parke Ustası
Çerkezköy Kurtarıcı
Okex Güvenilir mi
Karabük Şehirler Arası Nakliyat
Şırnak Lojistik
35954
ReplyDeleteMuğla Evden Eve Nakliyat
Bilecik Şehirler Arası Nakliyat
Batıkent Boya Ustası
Çerkezköy Yol Yardım
İstanbul Şehirler Arası Nakliyat
Çerkezköy Çatı Ustası
Sincan Boya Ustası
İstanbul Şehir İçi Nakliyat
Tokat Şehirler Arası Nakliyat
4D817
ReplyDeleteÇerkezköy Mutfak Dolabı
Edirne Evden Eve Nakliyat
Silivri Duşa Kabin Tamiri
Ünye Oto Lastik
Okex Güvenilir mi
Binance Referans Kodu
Keçiören Fayans Ustası
Niğde Evden Eve Nakliyat
Adana Evden Eve Nakliyat
89D8C
ReplyDeletereferans kimliği nedir
resimli magnet
resimli magnet
binance referans kodu
resimli magnet
binance referans kodu
binance referans kodu
referans kimliği nedir
binance referans kodu
52162
ReplyDeletebinance referans kodu
resimli magnet
resimli magnet
binance referans kodu
resimli magnet
referans kimliği nedir
binance referans kodu
binance referans kodu
referans kimliği nedir
35224
ReplyDeleteKripto Para Üretme
Facebook Sayfa Beğeni Satın Al
Bitcoin Nasıl Alınır
Tiktok Takipçi Hilesi
Tumblr Takipçi Satın Al
Milyon Coin Hangi Borsada
Threads Takipçi Satın Al
Bitcoin Madenciliği Nedir
Pepecoin Coin Hangi Borsada
C3D0C
ReplyDeleteTumblr Takipçi Satın Al
NWC Coin Hangi Borsada
Tumblr Takipçi Hilesi
Bitcoin Madenciliği Siteleri
Flare Coin Hangi Borsada
Spotify Takipçi Satın Al
Threads Takipçi Hilesi
Facebook Beğeni Hilesi
Lunc Coin Hangi Borsada
26F5E
ReplyDeletekripto para haram mı
binance
bitcoin ne zaman yükselir
kripto para telegram
probit
referans kod
referans kimligi nedir
bitcoin nasıl oynanır
kripto para nasıl alınır
C08F1
ReplyDeletekripto para nereden alınır
canli sohbet
referans kodu binance
probit
bitcoin hangi bankalarda var
referans kimliği nedir
kredi kartı ile kripto para alma
vindax
gate io
UHJKMHUK,M
ReplyDeleteشركة تسليك مجاري بالقطيف
شركة تسليك مجاري بالقطيف 3OSgFUzRPF
ReplyDeleteشركة عزل خزانات المياه VAYdaXR1P3
ReplyDeleteشركة صيانة افران بالاحساء YT7y6G6KIF
ReplyDeleteرقم مصلحة المجاري بالاحساء 6frvmqWgMf
ReplyDeleteشركة تنظيف سجاد بجازان ExHXgyRDMn
ReplyDelete99DD2A3BFA
ReplyDeletetwitter türk takipci
620E68184F
ReplyDeleteinstagram türk takipçi alma
instagram beğeni satın al
garantili takipçi
twitter takipçi
güvenilir takipçi